The Val Ease Central Railroad ©
Taking Z Scale to the Public Around the World
(Text and photos © Copyright Jeffrey MacHan)
Howard Kannitbee, P.E., Superintendant of Engineering, VECRR
Construction Diary - Opening "Val Ease Summit"
VES Construction, part 5: Summit Mountain undergoes a "major" operation
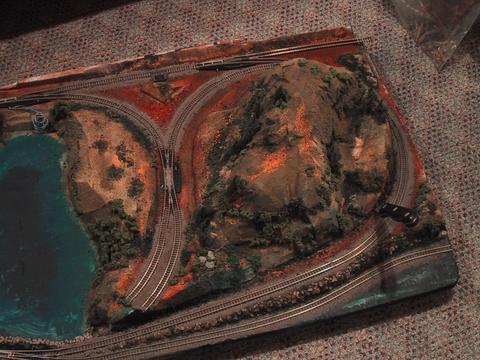
An overhead shot of "Val Ease Summit". Still a lot of work to be done, more trees, a lake! and tons of detailing but you get a pretty good idea of the "look" of the module at this point. What's that knife doing there?
You have no doubt been following very closely the progress reports on VES. In an earlier post, I mentioned that I would have to find a way to deal with the 10" height of Summit Mountain when the lid of the suitcase only permits a 3" clearance. Well this evening I applied my theoretical solution and I'm happy to say that it worked like a charm. I'm so proud of myself :-)
OK, here's what I came up with....
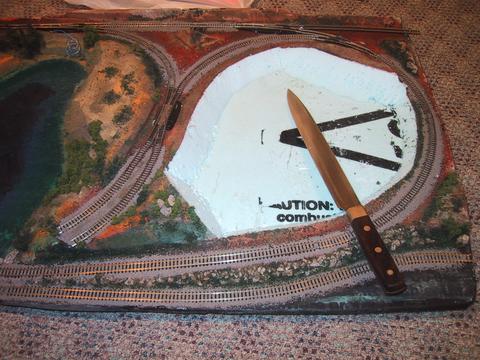
The Mountain (gasp!) has disappeared!
First, you recall that VES is composed of a 1.5" main base of blue styrofoam insulation board which is also the level of the lower track roadbed. This main board sits down inside the suitcase with 1/4" showing above the lip of the suitcase. Glued on top of that base is a 1.5" secondary layer which forms the roadbed for the upper trackage. Summit Mountain rises 6" above the upper trackbed level for a total of about 7.75" above the suitcase edge. The trees that will eventually crown the mountaintop will soar another 1.5" above the rock for a total elevation of 9.25" or there abouts.
The mountain base is shaped in such a way as to allow a ravine or ditch to run most of the way around it. My solution was to take a very sharp carving knife and carefully cut at a 45 degree inward angle all the way around the base of the mountain following the ditches, ravines and other natural seams. In essence I cut through the secondary base only. Then, using a long thin blade (i.e. bread knife), I managed to cut through the rubber cement I had used to join the first two layers of foam together. I did this by inserting the knife from the nearest (Right hand) side between the two layers of foam. This is one reason I use rubber cement when I'm not totally sure of the joint. If I need to separate the layers I can do it without too much of a struggle. For a permanent joint I use full strength tacky glue.
I was able to remove the mountain by carefully lifting straight up. I was left with a nice depression in the base. The next step was to use the carving knife and cut straight down throught the foam base cutting along the edge where the angled cut met the base. When finished I was able to remove a section of the base leaving a nice hole where my mountain once stood. The hole is about 1.5" smaller all around than the base of the mountain.
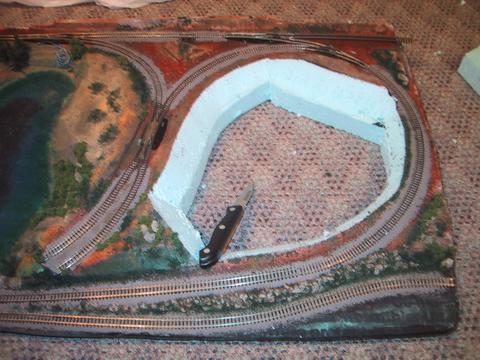
The hole where the mountain will hopefully poke through.
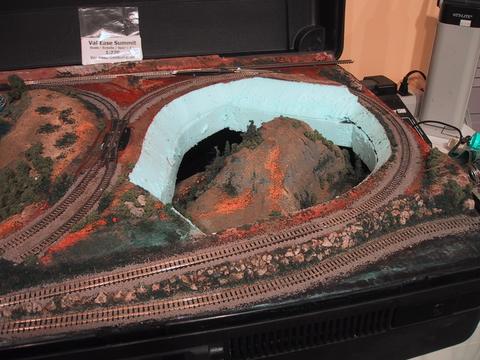
Summit Mount peeks out at the world above.
My detached mountain fits perfectly up through the beveled hole I have cut into the base. For storage of Summit Mountain in the suitcase when it is all closed up all I have to do is put the mountain inside the suitcase with it's top (i.e. summit) poking through the hole in the base. With the base of the mountain sitting on the bottom of the suitcase, the hole is big enough to allow the fully scenicked and forested mountaintop to fit through the hole without hindrance. Note: the bottom of the base layer of styrofoam is 4" from the bottom of the suitcase so the hole has to be bigger than the area of Summit Mountain measured 4" from it's base.
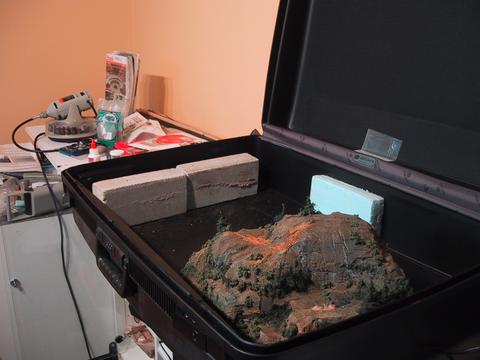
It's about time I removed the last two bricks. Note the large amount of storage space available.
To keep the mountain in position on the bottom of the suitcase I will glue magnetic sheets to the mountain base and to the suitcase. The trick to keeping an object in the same position using magnetic sheets is to place the two sheets face to face so that the magnetic fields are lined up and the sheets "lock". The sheets will resist any slippage from side to side or in a circular pattern. The lines of force will keep the sheets aligned. With both sheets stuck together I will glue one to the bottom of the mountain and let the adhesive set. Then I will apply glue to the bottom sheet (while still firmly magnetically locked to the top sheet) and place the mountain in position inside the suitcase. Obviously I will have to place the base in position in the suitcase to make sure that all is well with my gluing plan. This means making sure that the top does not touch the sides of the hole in the base and any trees on the mountain do not want to poke into the main foam base anywhere.

Work continues on the riprap along the back mainline over the lake.
Once the adhesive has set I should be able to tilt up the layout base, remove the mountain by lifting gently. Storing the mountain is simply a matter of lifting it out of it's beveled seat, tilting the base up and positioning the mountain over the bottom magnetic sheet which should line up perfectly to it's mate on the bottom of Summit Mountain. As an extra positioning precaution, I will probably glue a couple of dollar store sponges in the suitcase to support the base and the mountain when the closed suitcase is upright.