The Val Ease Central Railroad ©
Taking Z Scale to the Public Around the World
(Text and photos © Copyright Jeffrey MacHan)
VEC “Quonset” hut - An Evening Scratchbuilding Project
Main Entry: Quon·set
Pronunciation: 'kwän(t)-s&t, 'kwän-z&t
From Wikipedia, the free encyclopedia (with enhancements):
A Quonset hut is a lightweight prefabricated structure of corrugated steel having a semicircular cross section. The design was based on the “Nissen hut” developed by the British during World War I. The name comes from their site of first manufacture, Quonset Point, in Davisville, Rhode Island. The Quonset design was built for the US Navy during WWII as an all-purpose, lightweight building that could be shipped anywhere and assembled without skilled labor.
The original design was a 16 by 36 foot (5m by 11m) structure framed with steel members with an 8 foot (2.4 m) radius. The sides were corrugated steel sheets. The two ends were covered with plywood, which had doors and windows. The interior was insulated and had pressed wood lining and a wood floor. The building could be placed on concrete, on pilings, or directly on the ground with a wood floor. Over 150,000 huts were produced for the US Navy. The final dimensions called for a 20-by-48-foot living-space size. Quonset huts were used for a large variety of purposes in the field. After the war, the huts were sold as surplus to the public for $1000.
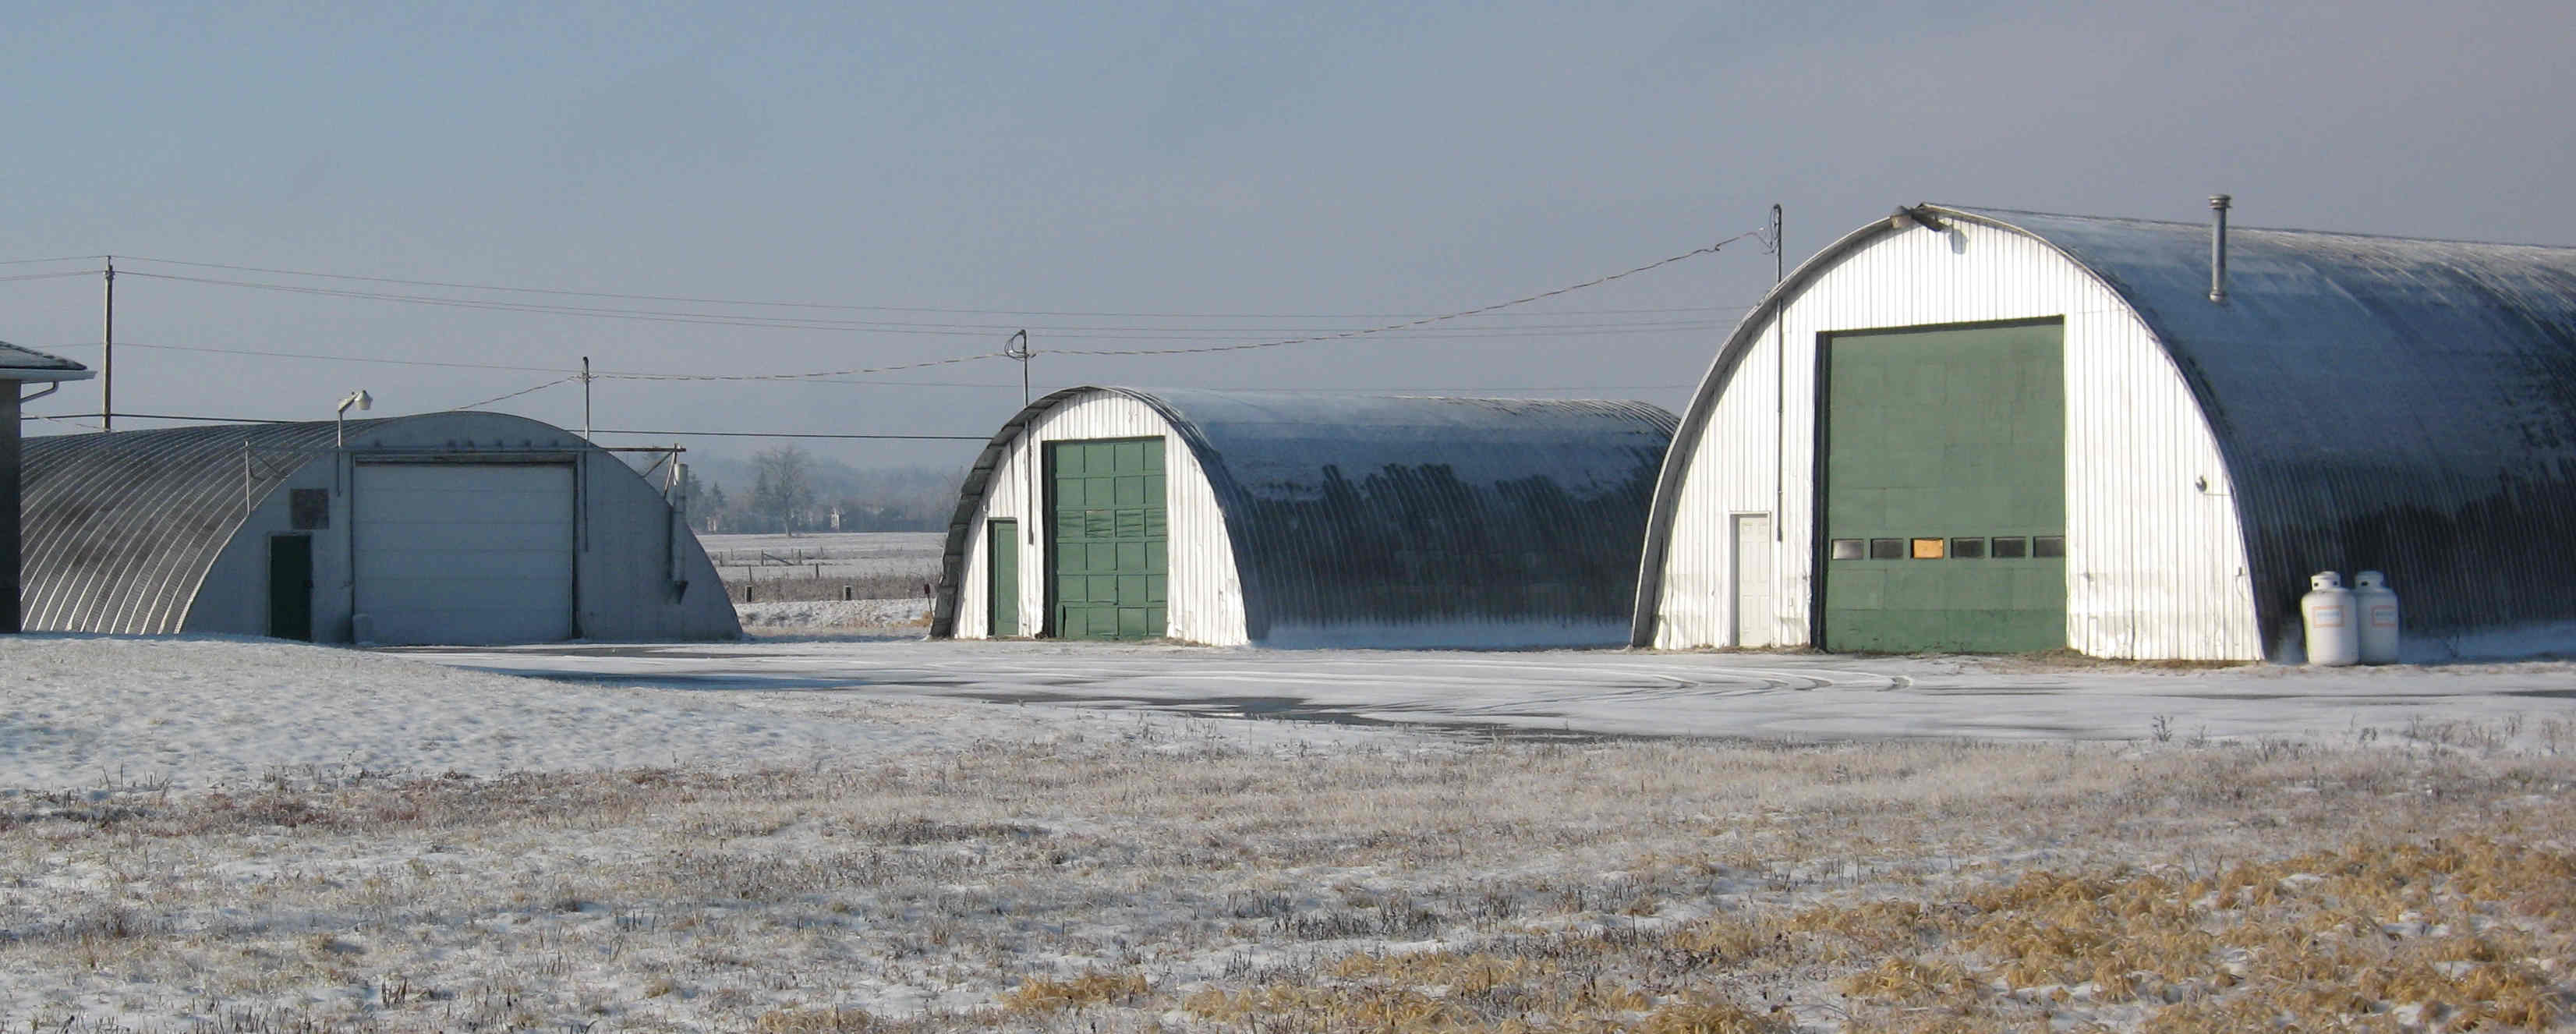
The Quonset hut is a very popular utilitarian structure in rural communities around North America as can be seen on this farm in Montebello, Quebec.
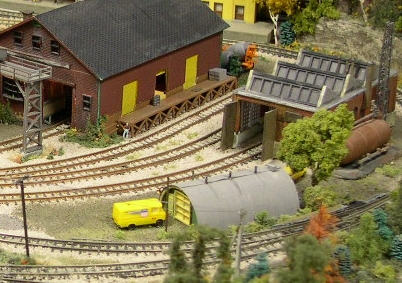
Like many railways looking to cut costs on non-revenue buildings, the Val Ease Central Railroad purchased several Quonset huts, one of which serves as the Maintenance of Way shop in Val Ease East yard.
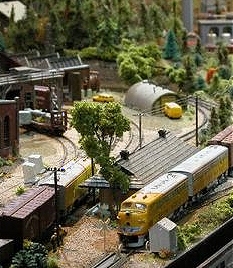
The VECRR Maintenance of Way crew makes good use of a Navy-surplus Quonset hut erected in a very tight spot in Val Ease East yard.
Now that we know what it is we're about to make the rest of the project should be no trouble at all. In fact, this is probably the simplest, most inexpensive and versatile structure one could add to a layout. Quonset huts are found all over North America and have been around since the transition era which means that they are very comfortable on layouts depicting eras from steam to modern diesel.
As the definition states, Quonset huts are made from prefabricated corrugated sheet metal. They were usually constructed inside of a day and there is no reason to take more than an evening on the workbench to make your very own Quonset hut.
Bill of materials:
- One 35mm plastic film canister (they may be harder to find in this digital age but you might be able to pick one of two up at your local photo print shop at the mall).
- One section of corrugated aluminum “siding” strip (ex. Campbell Scale Models)
- Medium styrene sheet or card stock
- Four Märklin “buffer” pins (I collected the pins from Märklin 0-6-0 8800 steamers that I converted to USRA Alco tank locos. No doubt it would be easier and cheaper to pick up the pins from an euro-style freight car).
- One large plastic industrial door from scrap box
- Two plastic standard doors from scrap box (NOTE: I never throw away any leftovers from plastic kits. Doors, windows, ladders and piping are especially useful for scratchbuilding projects. If you do not have any extras, then doors can be made from a flat piece of styrene or thin card stock cut to shape. Ribbing can be added using very thin strips of card stock glued to the face of the door.)
- Scrap styrene pieces for air conditioner, packing boxes, etc.
Tools
This project is best completed using the following tools:
- a very sharp hobby knife,
- cutting mat,
- steel straight edge,
- a rubber band
- a razor saw,
- tweezers,
- rubber cement,
- a pin vise with a small diameter drill bit or a small diameter jewelers screw driver,
- acrylic paint,
- weathering chalks,
- dilute India ink,
- ground cover material (foam / foliage / grass),
- tacky craft glue.
Let's get started!
Cutting out the end caps
Using the base of the film canister, trace a full circle on the piece of styrene sheet or the card stock. Next, trace a line through this circle dividing it into equal halves. Using the sharp hobby knife, cut out the circle and separate it into two halves. These halves will be end caps for the Quonset hut.
Preparing the shell
The hardest part about this project is cutting the plastic film canister in half. There are any number of ways to do this. I used a small rubber band as a cutting guide for the razor saw. Using the small rubber band, wrap it around the length of the film canister so that you have a nice straight cutting guide for the razor saw. Then score the plastic shell with the saw at each edge. This will give you a reference point if the rubber band slips during cutting. I found it easiest to cut along the bottom first, then up the sides to the open end. Do whatever you think works best for you. I do not suggest using the hobby knife for this operation since it is rather difficult to hold the canister securely. The rigid razor saw blade will also help to keep the cut straight.
Shaping the aluminum strip
The aluminum strip must be shaped into a curve across its width, end to end down its length. Remember that the ridges serve to direct rain water down the sides of the hut. We will need two canister-length strips of siding, plus a wee bit of overhang. I used the canister to act as a mold to shape the aluminum. Try not to flatten the ridges. They are important to provide texture to the finished hut roof.
Cut two equal-length strips and put them aside. They will be glued to the hut after the end pieces have been attached.
Gluing the end caps
I used rubber cement to attach all of the parts of this project. It is a quick and effective adhesive for dissimilar materials. There is not much of anything that will stick to the plastic film canisters. Now is the time to glue the half-circle caps into place on the half shell. A little dab of rubber cement on each surface to be attached is all that is needed. If you apply glue to both surfaces and wait a minute for the glue to become tacky, then it acts like a contact cement. If you apply the pieces while the glue is wet, the cement will take longer to set. Place the canister on a flat surface such as the cutting mat to make sure that the bottom edges are flush with the ground. You might have to trim the bottom edge slightly with the hobby knife to make everything fit nicely. Paint the end caps your favorite railroad color. Mine just happens to be olive green. An acrylic paint works nicely for such a small project and dries fast.
Adding the doors and windows
If you have scrap doors for this project, I suggest that you paint them before gluing them to the end caps. You can also cut out doors from a small piece of styrene sheet or card stock. I painted my doors UP armor yellow in keeping with the corporate color scheme. (Following a reverse takeover, the VEC is now part of the Union Pacific system). I placed an industrial door at one end of the hut since there was no room for a drive-through arrangement on the MOW lot.
The corrugated ribs of the aluminum strip run vertically. The “buffer” pins help to keep the seams flat along the joint.
Attaching the roofing and finishing touches
The roofing sections meet along the top center line of the hut. I used the rubber cement contact-cement technique in order to assure a strong bond. You may notice that the edge along the seam tends to lift. That is why I use the buffers as anchor pins in this project. They also look great as ventilator exhausts. Using the pin vise, I pierced three holes, one in the mid-point, and two equally spaced from the edges to the center point. The buffers should make a nice tight fit (It might be a good idea to do some test holes on some scrap material to make sure that you get a snug fit. The buffers have a lip which comes in real handy to hold the siding seam in place. I used the fourth buffer as a stack for a stove or furnace placed to the side of the roof but in line with the small door, not the large industrial door. You do not want to have a stove blocking your MOW vehicle when the door opens, do you!
I glued a small piece of styrene block to the back roof on the center line as an air conditioning unit. The next step is to paint the roofing your favorite roof color. Once again, I took my inspiration from the corporate color palette and used UP armor grey! I used a very light stroke of a small paintbrush dipped in the full strength acrylic paint. It is quite apparent that the best way to paint the roof is to follow the ridges down the sides of the hut. Once the paint is dry I added weathering in the form of soot streaks from each chimney pipe. I also added rust streaks to the edges of the roof line and around the doorways. Once glued in place using some white tacky craft glue, I placed weeds and bushes around the sides of the hut and piled up some MOW “stuff” along the sides of the hut. A little dab of tacky glue on the bottom of each piece made sure that they would stay put! I completed the scene with a UP panel truck, a concrete pad (styrene sheet) and a Märklin country streetlight (wooden pole).
NOTE: for added interest, you could modify the project to have an open door to the Quonset hut and go the extra distance with some interior details and lighting. There you have it, an easy, good-looking and inexpensive project that is sure to provide a versatile scene for railroads of all eras – all in one evening at the workbench. Enjoy your trainz!