The Val Ease Central Railroad ©
Taking Z Scale to the Public Around the World
(Text and photos © Copyright Jeffrey MacHan
Last Spike: Val Ease Summit, Making a Mountain out of a Mole hill or... Tips on Using the Tippi Hot Wire Foam Cutter
Attention: the hot wire can cause a painful burn. Read and follow the safety instructions. Handle the unit with care and safety in mind. Always unplug when not in use. Never, ever, tape the trigger in the on position. I'm also pretty sure that breathing the fumes of melting foam as you work is not especially good for one's health. Always use the tool in a well-ventilated area.
Carving techniques
Cutting a roadbed and shaping a mountain require two skill sets. Let's talk about the easy task first.
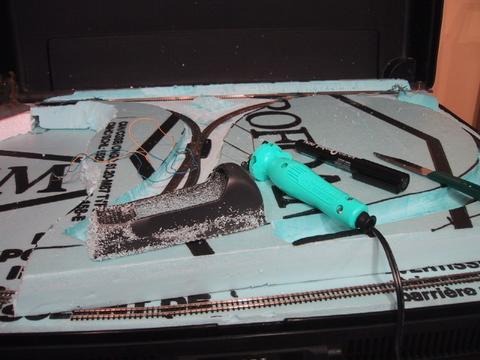
The Tippi Cutter makes working with styrofoam a real pleasure. The rasp makes working with styrofoam a real mess!
As can be seen in the photos of the early stages of roadbed cutting, the track sections were placed on the foam and I traced the outline for the width of the cut leaving about 3/4" clearance on each side of the track. The total width of the trench to be cut was about 2". I began the cut by holding the tool so that the wire would cut a vertical side to the trench. Note: it would be easy to form sloping walls later when I actually knew what I wanted to achieve. I did not attempt to cut more than 1/2" in depth. There is a lot of resistance to pulling the Tippi cutter through the dense blue foam whereas it flies trough white foam packing like a hot cutter through butter. The wire had a tendency to twist in the cutter posts. I needed to tighten the locking screws on occasion to keep the wire in place. I usually cut strips that were about a foot long (the point when my hand would get sore and I had to stop to relax my grip a bit. There's always a practical reason)!
Useful tip: the secret to a straight cut is to use the right "blade" or cutter tip and to use a firm, slow (keeping the tip hot) and even cutting motion.
Useful tip: rather than picking the fine "hairs" or "strands" or "strings "that the cutting process leaves when you remove the cut section, use the hot tip to quickly melt the pesky filaments. My personal favourite method is to simply rub my hand over the foam surface to break off the whiskers and then vacuum them up from the floor when cleaning up my mess.
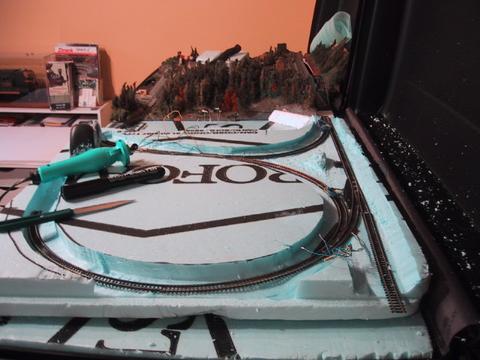
I removed rough strips all along the marked right-of-way then I began a second cutting session where I tried to remove foam as close to the final grade as possible without going too deep.
Useful tip: to cut to a specified depth, after getting the proper measurements, I simply used a felt-tip marker to place a dot on both wires as a depth guide.
The final removal of material to make a smooth grade was done using the small hand rasp. The nice thing about using the Tippi was that the surface of the foam had melted slightly and hardened which made using the rasp easier. True, I swear!
Useful tip: the Tippi does not do a good job of removing fine slivers of material. The foam tends to melt and stick to the hot wire. See the second part of this sidebar for sculpting tips.
Once the grade was even along its whole length, I took the Tippi and used one corner of the square wire to remove a very small sliver of foam along the outside edges of the trench to make rough drainage ditches. The ditch between the track and Summit Mountain would be filled with weeds, bullrushes and other undergrowth that would help hide the separation joint of the removable mountain section.
Useful tip: its easier to remove extra material later than to have to add filler. I tend to be conservative and take small pieces of terrain rather than large chunks that I might regret later.
I marked the maximum depth of cut on the wire tip to keep me from cutting too deep when making the grade trenches. I've found it much easier to remove material than to add it later.
Making a mountain out of a mole hill
Shaping a hillside or even worse, sculpting a mountain from a stack of rough styrofoam scraps is more an art than a technique. I'll try to explain some of the things I kept in mind as I "perfected the look" of Summit Mountain.
You might have noticed that Summit Mountain started out as a stack of three rather irregular pieces of scrap styrofoam insulation board. I would have liked to have had some larger pieces but they "worked" in the rather limited space available. The smallest piece was on top of the pile and the largest piece made up the base. I found a couple of extra scraps of white packing foam to fill in some obvious gaps in the base which I figured should start out as a full block in which to play with the Tippi cutter.
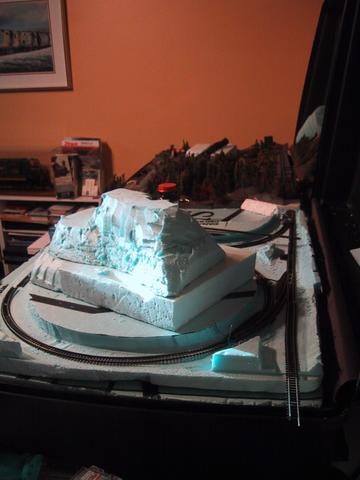
It's hard to imagine that there's a mountian hidden in this pile of scrap styrofoam.
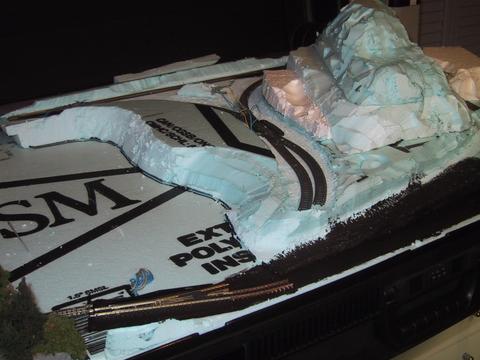
One area of concern was the back side of the mountain. After a very long period of reflection about a believable industry to inhabit VES, I decided that a quarry would make perfect sense. The cut stone would naturally be shipped out on flats and gondolas that would make use of the second wye lead. The quarry would allow me to cut steps into the side of Summit Mountain facing the mainline and the wye. That meant that I would really have to concentrate on three sides when it came to producing a "natural" look to the rock.
Useful tip: avoid shaping the mountain so that it looks too symmetrical. Plateaus, ledges, cuts and ravines make great areas to plant trees, fill with rock falls and dead branches.
I wanted to show a good deal of rock on Summit Mountain. It would have been easy to simply cover most of it with trees and foliage clumps. That may have looked great but I wanted to highlight the Mountain as a huge piece of granite, something that wasn't easily tamed by the engineers and labourers of the VECRR. So, the time had finally come to prepare the surface of the foam before painting. The Tippi tool made short work of flattening little outcrops of rough foam that needed attention. I just ran the hot wire lightly over the spot to be melted until it flattened. It was also easy to form gullies and ravines using the same tip and letting it sink a bit into the foam. I went over most of the rock surface with the tip, adding some "character" to otherwise plain and flat rock faces. The hardened surface also made it easier to cut cracks and striations using the point of a sharp hobby knife blade.
The various tips can be used to remove large sections of foam, to cut and gouge, to shape and sculpt. Practise makes perfect or in my case, ground foam to the rescue.
My last word on sculpting is to allow yourself the freedom to take a break and let the scene repose for however long it takes for inspiration to come along. The moral of this story is that having the right tool in my hand even made carving styrofoam en enjoyable experience. Now that's quite an accomplishment!