The Val Ease Central Railroad ©
Taking Z Scale to the Public Around the World
(Text and photos © Copyright Jeffrey MacHan)
An 8 Silo Grain Terminal for Centre Val Ease: Preparing and painting a Microfigs epoxy resin building kit
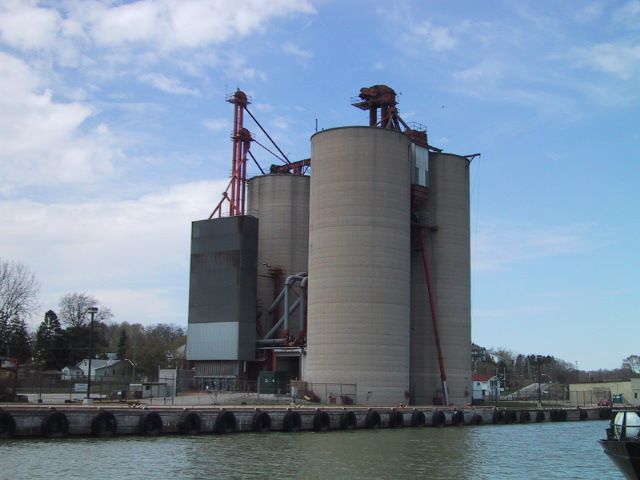
Concrete grain silos are a common sight along North American railroads.
Considering that the scenery on the VEC is for all intents and purposes 99% finished, it was a stroke of luck to find that the elevator fit exactly in the space previously occupied by a station and freight depot next to Centre Val Ease Docks. When I eventually got to thinking about it, a grain elevator made much more sense on the dock than a freight and passenger depot. Of course, bumping is a time honored tradition in the real world of railroads by unionized employees however, not by buildings! In this case, the elevator bumped the depot which bumped the switch tower in Val Ease East yard. Removing the yard tower was less painful than expected when I realized that a series of 6 switches hardly required a CTC tower! In addition, placing the station in VEE added another stop on the timetable.
Anyway, I digress, back to the elevator kit. It fit but it was awfully white! The kit is undersized for Z but the advantage is that it does not overwhelm the rest of the scene. Details like doors could be fixed and windows in elevators were not large affairs to begin with. After months of procrastination I finally decided to dig out my hobby paints and airbush.
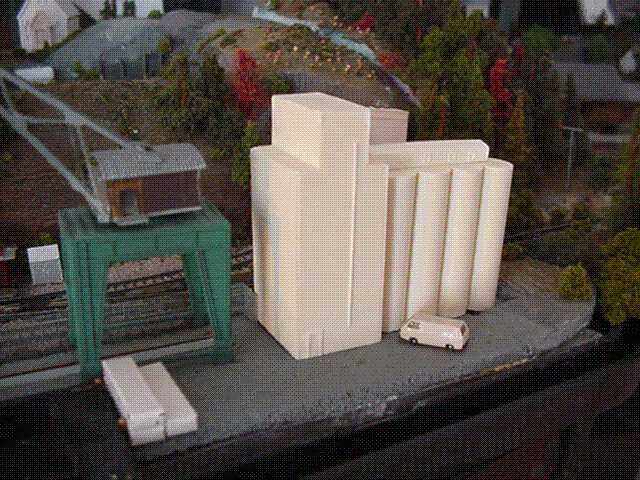
The Microfigs 8 silo grain elevator kit right out ot the box. Notice the size of the door casting.
Resin kits are cast and depending on the quality of the mold will have flash that needs to be cleaned up and, occasionally, holes (ex. air bubbles) to be filled. The castings also may have a coating of release agent from the mold which must be removed before painting.
After washing the three pieces that make up the silo kit (elevator building, silos and conveyor housing) in warm soapy water, I rinsed them and let dry thoroughly over night.
The next step was to examine the parts and remove any flash with a hobby file or sharp knife. Fortunately the Microfigs kit had very little flash to speak of which was quickly remedied with a few strokes of the file. There were no holes to be filled. However, if there had been, I would have used a bit of model putty to fill them. Then after sanding smooth the kit would be ready for painting.
Painting strategy
The elevator kit presented a wee bit of a challenge. The deep cuts between the silos would make airbrushing difficult and if there had been patching, the putty would require a primer coat.
I decided to apply the paint to hard to reach areas with a wide stiff brush. I began with the silos using a water based paint: Polyscale #414332 New Gravel. I brushed a solid coat between the silos making sure that I had covered the depths with paint. Since silos are made by successive pours of concrete, there is a layering effect between pours when the concrete dries. So to avoid vertical lines from my brushing, I dragged the brush horizontally away from the groove to smooth the paint. I eventually decided to apply paint to the entire surface with the brush, always painting in horizontal strokes. I put the silos aside to dry and proceded to the next task.
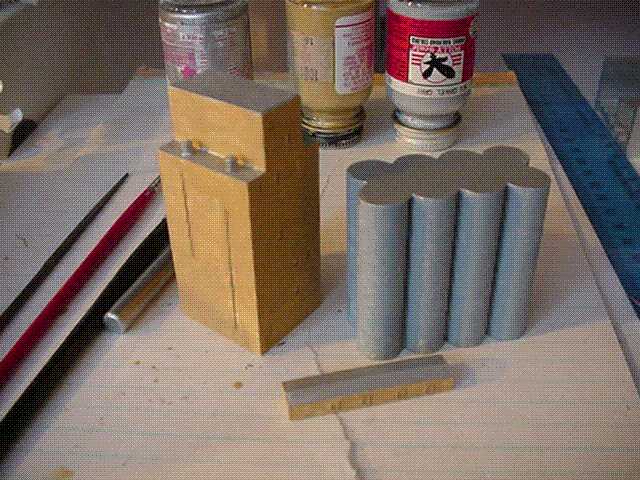
Simple tools and water based paints are all that are needed however brush painting leaves something to be desired.
The elevator has a horizontal wood siding finish so I decided to use the brush again. The real reason was that I hadn't found the hiding place where I had stashed my airbrush! I forged ahead making sure that I left no ridges of paint on the edges of the casting. Here I used a solvent based paint, Floquil #R87 Depot Buff. The elevator was put aside to dry while I used the same color to paint the conveyor housing.
I especially like the texture of the roof on the kit which resembled a rough stone surface except for the silos which had a corrugated metal roof. Staying true to my illogical form, I painted all the roofs metallic silver using another Floquil product. I brushed it on using a fine brush this time since it was necessary to gently paint up to the edges of the siding and around the exhaust stacks on the elevator building.
Final painting
When the paint was dry on all the parts, I assembled them temporarily on the layout to look them over. Well, it was time to find that airbrush!
After a rummage through my storage boxes, I found one labeled 'airbrush' and quickly got back to the bench. Because of the base coats in the primary colors, the final airbrushing was over with in a matter of seconds, just enough paint was used to even out the final coat. It took more time to clean up than to do the painting!
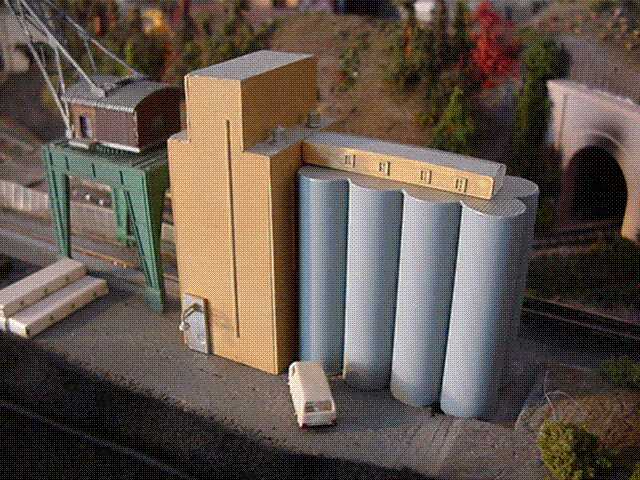
The elevator is ready for weathering, piping and a sign!.
Adding a door to the elevator was a simple matter of cutting a rectangular piece of styrene to which I added a left over light from a Z plastic kit. I painted the door silver and when dry, I scraped off the paint from the resin surface, applied a drop of Piko styrol glue (it's wonderful stuff) to the elevator and placed the new door into position.
The glue held fine and the paints adhered wonderfully. I would recommend the water based Polyscale line for their ease of use, clean-up and no toxic fumes.
The last word
The elevator now sits proudly on the dock awaiting final details like weathering with chalks: rust along the metal roof of the silos, white patches on the silos themselves, black for highlights on the elevator building and horizontal streaks of dark gray around the silos to represent pouring bands. I also expect to dig out some wire insulation for car loading tubes and wire stock as delivery pipes to the dock itself for ship loading.
The kit was easy to prepare, paint and assemble. Despite their slightly smaller scale, Microfigs industrial structures should be right at home on Z layouts.