The Val Ease Central Railroad ©
Taking Z Scale to the Public Around the World
(Text and photos © Copyright Jeffrey MacHan)
Turnout Motor Camouflage Techniques Used on the Val Ease Central
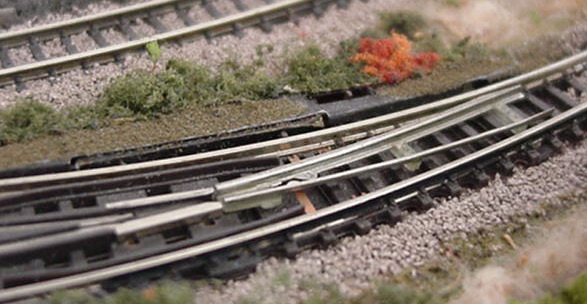
Hiding the "Big Black Box" on a curved turnout.
In a previous Ztrack article, I described a simple trick to improve the look of Z scale's oversize rails by weathering them using one's favorite paint or ink. Strangely enough, for a long while I simply accepted the Big Black Box (Marklin's metal housing for the double solenoid mechanism) as part of the visual cost of modeling in my preferred scale. However, that all changed following a lively debate on Z_Scale@egroups.com that concluded that the best solution to the visual pollution of our layouts was to relocate the motors below the roadbed.
After careful consideration, I accepted the fact that it was not feasible to modify the 35 turnouts making up the Val Ease Central's trackage both due to physical limitations and to cost factors. Nevertheless, I could no longer turn a blind eye to the BBBs. I was on a mission and something had to be done...
Attempt #1: Shrub-a-dub-dub! = Failure!
Since all of my BBBs were already permanently installed on the layout, my first instinct was to find a way to apply shrubbery clumps to the top of the motors. I used double sided carpet tape cut into very thin strips placed on the surface of the M turnout motor. I then covered the track and motor lever with tape to keep foreign objects out of the mechanism. I finally applied small pieces of foliage, foliage clumps and other terrain materials to cover the strip of double sided tape. The final results were works of Art!
4 BBBs had received this makeover before I thought of running a long passenger car through the turnout to test clearances. Guess what? The car overhang got caught in the scenery materials! Now I remember why the Marklin motors are housed in that low profile casing. Although this attempt was a complete failure as turnout motor camouflaging, I have discovered its merits as removable camouflage along the separation seams of the adjoining pieces of the Val Ease Central. I'm sure that many other uses are possible.
The BBBs are much less distracting when comouflaged.
While scouring the detail parts section of a local hobby shop, I discovered (and promptly emptied them out of) N scale relay sheds which, in Z scale, appear to be the size and shape of yard or speeder sheds or shanties.
Once again I had hoped to disguise the middle of a BBB using props. This time I placed several sheds along the BBB but when I pushed a full length passenger car through the curve of the turnout it unceremoniously knocked the sheds away. Once again it's always a good idea to run your longest car through the curve to check clearances.
Since the sheds wouldn't be covering switch motors, I used the the small ones as signal boxes near grade crossings and as industrial buildings elsewhere on the layout.
Exception: I did find some small N scale relay sheds that fit nicely on the BBB of the Marklin double slip switch without fouling the train.
Here is what I used:
Cal Freight N scale #2110 Pkg-2 Relay Cabinet, Large (speeder sheds)
Cal Freight N Scale #1195 Pkg-2 Relay Shed (thin sheds in Z)
I also had some success using short pieces of Plastruc structural shape as rails stacked along the outside edge of a regular turnout BBB. I first marked the nearest position that my passenger car would allow me to place the rail and placed the stack a couple of millimeters outside of the mark. These pieces of plastic rail, after being painted a nice rust color, also look very good placed along side the right of way to simulate old rails that are waiting to be picked up by the track gang.
Attempt #3: Thinner is Better = Success!
In my early experiments, I had learned that attaching something as small as fine ballast to the BBB was enough to cause clearance problems with my longer pieces of rolling stock. The thinnest scenery material left to me was acrylic paint. Paint alone didn't do it for me so I added Woodland Scenics grass powder to the recipe.
First I blocked the openings in the BBB using tape to avoid getting paint and powder inside the mechanism. Then using a fine paint brush, I applied a good coat of neutral gray acrylic directly from the tube, covering the entire surface and avoiding the rails if possible. If you do get acrylic paint where it shouldn't be, such as rails, it is easily rubbed off once dry. I made a point of painting beyond the BBB onto the ballast about a centimeter at both ends.
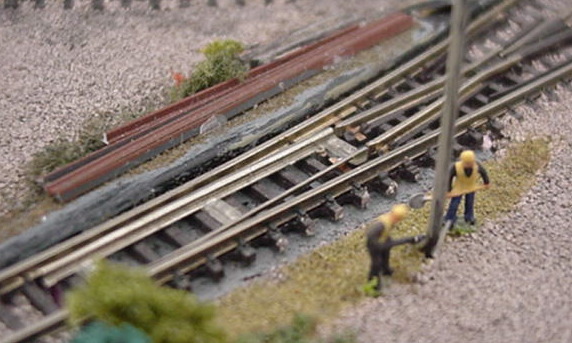
Using plastic structural shapes to simulate rails stacked along the turnout.
As a final touch, I glued little pinches of Woodland Scenics foliage material at the ends of the machines. The electrical contacts on the opposite side of turnout from the motor got a dab of paint and some foliage material as well. Don't forget to camouflage the electrical wires as well. No sense doing the BBBs and leaving a nice flash of yellow and blue on the other side of the turnout, right?
Hint: in order to better blend the motor into the background, you may be tempted to vary the color of the ground covering. Using a dark colored ballast will also make this task easier. Unfortunately I used a medium gray ballast on 80% of the layout. However, I found that the dark green of the burnt grass worked well over all. Personal tastes will vary.
It took me three nights to finish all of the BBBs on the layout but the time was well spent. I don't know why I didn't "see" the need to camouflage the motors earlier. By the way, camouflaging turnout motors is a minimum requirement of the National Model Railroad Association Achievement Program - Master Builder, Scenery certificate.
This is an inexpensive and easy technique to greatly improve the look of your Z scale empire. Enjoy your trains!