The Val Ease Central Railroad ©
Taking Z Scale to the Public Around the World
(Text and photos © Copyright Jeffrey MacHan)
A Scene Stealer on The Val Ease Central, The Old River Lighthouse
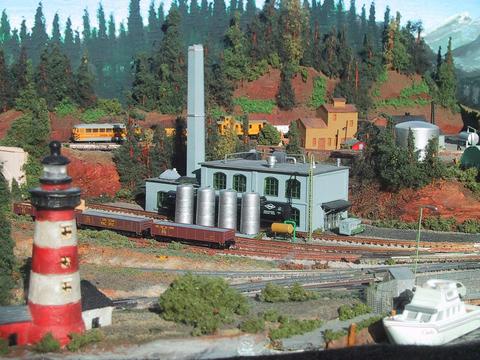
The Old River Lighthouse dominates Val Ease Port Authority in Centre Val Ease.
One of the most satisfying moments I have when displaying the Val Ease Central at train shows happens when a young train enthusiast points excitedly and says, "Daddy, Look!" and shares the wonder of seeing one of what I like to call scene stealing elements of Val Ease Central scenery. There are several, positioned to attract and guide the attention of visitors from every angle of approach to the layout. To the West there is the trestle and dinosaur park, to the East, the turntable, operating roundhouse and arc welding shop. However one of the most visible and striking effects is the old river lighthouse on the front edge of Centre Val Ease. The very realistic simulated rotating light can be seen from across the hall and is placed, as the name implies, in the centre of the layout.
Setting the scene
The lighthouse is part of a scenery composition that includes an industrial wharf where ocean and river tugs can tie up while their barges are loaded or emptied. Centre Val Ease Port Authority handles a large amount of outgoing lumber and mineral barge loads as well as receiving the odd industrial machinery shipment. Geographically the port is on a major inland waterway that regularly receives ocean traffic. Although the old lighthouse is now a historic structure, it still serves as a grim reminder that the river presents certain risks to navigation.
Looking for inspiration
Z scale offers great creative opportunities to produce a credible and enjoyable scenes. Lighthouses are often majestic and impressive structures. The challenge for most modelers is to incorporate a building that complements the scene without overwhelming it. Since there are no Z scale kits readily available it was only natural to look outside the hobby kit sources.
How often have you seen the resin replicas of famous American lighthouses? They come in all shapes and sizes and price ranges. I had always kept an eye out for anything that could have Z applications. One day while browsing in a home accessories shop at a factory outlet centre I came across the perfect lighthouse. It was a classic red and white tower with three outbuildings, the price was right and, best of all, it was straight! Many of the cheap resin structures that you will find will have very noticeable flaws. I eagerly showed my discovery to my wife who sweetly responded, "How can you possibly make a lighthouse with THAT?" to which I replied, "I only paid $1.50 for it after all..."
The gauntlet had been thrown, now I only had to find the answer!
Building the model
Later (I won't say how much), while browsing through the non Z section of a hobby shop I found the perfect lighting kit to power my lighthouse. No, I hadn't forgotten it! Miniatronics Corp. makes a nifty Lighthouse Warning Light which costs many times more than the resin lighthouse. The kit can be powered from a 6 to 12 volt regulated DC source. Watch out for the polarity, you don't want to fry the flasher circuit. For testing purposes I used a nine volt battery. The final installation in the layout incorporates a variable voltage DC wall transformer set to 7.5 volts which eliminates batteries and powers on when I plug in the layout. I also found that a lower voltage setting slightly reduced the brightness of the light to the point that I no longer needed sunglasses!
The first challenge was to find a way to remove the rocks and waves molded into the base of the lighthouse. I began with a few half hearted attempts with a razor saw until the resin heated and grabbed the blade. And I could cut my way out of jail before making a dent in the thick resin base with a file. Finally I decided to use the heavy artillery...a metal hacksaw!
The trick is to use a new blade and to cut with a slow even motion so as to make a clean cut and to not overheat the resin. In about 5 minutes the base was a thing of the past. I used my heavy file to clean up the rough edges and to flatten the cut of the base.
The next step consisted in removing the simulated light by cutting off the cap above the light section then cutting the light section from the tower. Filing flattened out the top of the tower and the base of the cap.
Okay, now for the delicate step of boring a hole through the lighthouse tower, vertically, of course! I clamped the lighthouse in a small hobby vise being careful not to put too much pressure on the resin. I used a small bore metal drill bit with the longest shaft I could find in my variable speed electric drill turning at a slow speed. Fortunately the lighthouse is not very tall and I was able to drill down from the top of the tower without splitting the resin. I would suggest using a drill press to keep the hole vertical if you have access to one.
The wires from the light bulb run down from the top of the tower through the base. The next hurdle was to find a way of enclosing the bulb in a clear case that would simulate the glass housing of a real lighthouse. What better than to resort to the hobbyist's friend, the BIC pen shaft. It's clear, it's hexagonal and it has a hole through the middle of it! After a couple of cuttings and test fittings I finally found a section that would snuggly fit the bulb. The bulb itself needed to be slightly recessed into the tower. I used a larger drill bit to enlarge the hole to a depth of a few millimeters so that the bulb and it's BIC housing could sit flat on top of the light tower. The cap fit well on top of the light.
I rushed to punch a hole through the styrofoam base of the layout so that I could run the wires and plug in the 9 volt battery. The effect was so impressive that I left the lighthouse flashing all night long.
As you may have guessed, I am pleased with the result. My wife thinks that this was the best $1.50 I had ever spent on my hobby. The moral of the story... use your imagination to find that Z scale diamond in the rough. It just may be a scene stealer.
Copyright Jeffrey MacHan
March 13, 2000